Neewer is a brand I see selling photographic equipment on Amazon frequently. For the most part they seem to be cheap Chinese versions of common products. I wanted to mount my backgrounds on the ceiling when I ran across their background roller system. It was cheaper than other similar background rollers and I liked that the brackets had 4 mounting holes instead of 2 like some of the other ones. I purchased a few of them and have been pretty happy with them so far.
There were a couple of issues that I'll address in my review of the Neewer Single Background Roller System and installation instructions. I'll also go over why I chose to use multiple single roller systems instead of a multi-roller background system.
Background Roller System Choices
The oldest choice for background roller systems like this was the
Manfrotto AutoPole Expan Kit. It was expensive and for a time the only system you could get. It's still available and very well made from a well respected company. The system comes with AutoPole's that allow you to set it up without any hardware pretty quickly.
These days there are more affordable roller system options for seamless paper and muslin backgrounds. Basically copies of the Manfrotto system made in China sold under brands such as Cowboy Studio, LimoStudio Fotodiox and Neewer.
You can also find them in configurations to hold
4 backgrounds, 3 backgrounds and even single background roller kits.
The multi background systems come with all the background roller supports connected together for each end of the support system. It can be mounted on a wall or ceiling.
Even though I was going to be installing multiple background rolls I didn't want to use one of these because the spacing between background rolls as well as the height difference from roll to roll would eat up more space than I needed and I'm already working in a space that's a little tight.
To save a few inches here and there I opted to go with three separate single systems. That way I was able to get them closer together and each one is the same distance down from the ceiling.
The Fotodiox and Neewer systems were priced within a couple dollars of each other for the single roller systems. I decided to go with the Neewer System because it had 4 screw holes in the hooks instead of 2 for the Fotodiox.
What You Get
The system comes with 2 expanding rollers, 2 roller brackets, a plastic chain, weight for the chain to keep it hanging straight and out of the way, an instruction manual and 8 fasteners that seem to be meant for masonry. These were useless to me as I was installing this on a wood framed, drywall covered ceiling.
What Else You'll Need
You'll need to keep reading for the specific sizes.
- Dimensional Lumber
- 8 (or more) Long Anchor Bolts for new framing into old framing plus washers
- 8 (for each single roller) shorter anchor bolts about the depth of the new framing
- 10' 2" EMT Conduit for each roller system about $16 from Dome Depot.
Attaching Background Roller Brackets To Drywall
Well technically we're not attaching it to drywall. I roll of seamless weighs about 15lbs the EMT conduit weighs about that or a little more. Multiply 30lbs by how ever many backgrounds you're installing and that's a lot of weight. I feel better making sure everything is secured into solid framing.
If you're installing this in a typical wood framed structure you'll need some additional framing. Whether you install it perpendicular or parallel to your framing you'll likely need some additional wood to hold the supports in place since the lengths of seamless paper don't coincide with the 16" on center that framing is typically spaced at.
You can either cut out the drywall, install the new framing securely into existing framing and repair the drywall, or you can just place the new framing over the existing drywall. It's not as clean looking but it's quicker and easier to do and creates less of a mess.

I decided to go with the latter and plan on doing the former when I have more time. As you can see I marked the location of the ceiling joists which run perpendicular to the direction of the background rollers. I used a peice of 5/4 x 4" lumber cut to a little longer than the space between the joists, drilled 4 holes for the anchors and then drove the anchors into place using a washer on each anchor. I used 5/16" anchors that were 3-1/2" long. I wanted the anchor bolt to go at least 1.5" into the existing framing. In my case I had 1" of new framing, 5/8" of drywall to go through which meant I needed at least 3-1/8" length to get 1-1/2" into the framing. I would have preferred a 2x4 but every bit of extra height I can spare helps.
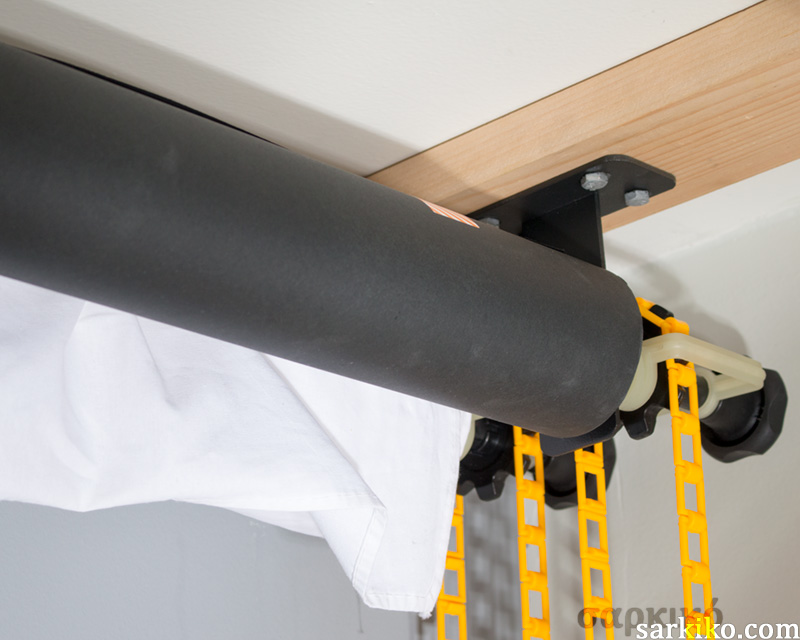
I installed the first side of the roller system so that there would be about 5-1/2 to 6" of clearance on the side to leave room for the chain and roller screw handle. Then I positioned the other framing so the distance between the center of the first support and the second support would be a little more than 1" greater than the length of backgrounds I'll be using with this background system.
The plastic piece of the other roller can slide back and forth a couple of inches so you get some leeway. Just unscrew the thumbscrew before trying to mount the roller so it slides freely.
To secure the mounting brackets to the new framing I used 1/4" anchor bolts that were as long as I could get to go into the new framing without driving through it. Same deal. Drill an appropriate sized hole and use either an impact driver or socket wrench to drive the anchor bolts in.
Washers aren't needed since the base of the bracket is metal.
One thing in the above photo that I noticed. The part of the bracket that hangs down is welded to the base of the bracket. The Fotodiox single roller bracket was an L shape that is formed from one piece of metal and even though it only has 2 screw holes, being one piece of metal has it's advantages. It's also has a smaller footprint which means I could get the backgrounds closer together.
Expand Rollers Into Background
The expanding rollers can be inserted into the ends of a roll of seamless paper.
Just stick one in each and end twist the knob until the roller is holding onto the core of the seamless paper roll securely. As you tighten the knob (clockwise) the two ends squeeze together and cause the white expanding part to expand inside the roll.
Ideally you're not going to want to put rolls of seamless up directly because as the rolls hang horizontally in the air they'll start to bow in the middle. This is especially true in more humid locations.
Instead you'll want to cut your 2" EMT down to the right size and roll your seamless paper onto the roll. In addition to not having to worry about sagging paper, you'll also be able to roll up muslin backdrops on the EMT as well.
I laid the EMT conduit next to the roll of paper, taped it carefully using duct tape to the EMT trying to keep it even, mounted the EMT on the roller system then used the chain to roll it from the cardboard core onto the EMT. Every once in a while make sure it's rolling up evenly. If it's not you can just pull the chain the other direction slightly and pull from one side to straighten it up.
It helps if you have someone to help you when you mount the backgrounds on the roller brackets but I was able to manage each roll fine on my own with a little patience.
The system works great and I have my backgrounds ready to go when I need to shoot and out of the way when I'm using the room for other purposes.