
Before I even get to the tutorial let me just say that as a an older white guy there are a million other things I'd prefer to talk about than anything to do with race. Trying to make an African-American model look like a pale white model and publishing this online is not comfortable. Especially since I tend to look at my pictures objectively in terms of light, shadow and colors that create a pleasing picture. People who know me understand, or at least I hope they do, that I'm not objectifying the woman in the photo.
The model in the picture is TigerLilly. She's exceptionally enthusiastic and a pleasure to work with in every way. She cosplays and dances to industrial music until her feet bleed. Women with TigerLilly's skin tone are not the first ones to come to mind when you think of those scenes. She's very beautiful and secure in the way she looks but she confided in me that she thought that might hold her back with her cosplaying. I thought that would be crazy because it's not bad to stand out a little more.
 |
| Yeah that makes me sound like this. :) |
We were going through some ideas for our next shoot and wanted a more goth look. We ran across a picture which I wish I saved to credit the photographer and model for the inspiration. It had a commonly scene cool, desaturated look with a very pale model with dark blue-black hair. The model and the photograph were just stunning and if I find it again I'll include it here.
Both TigerLilly and I really liked it but she made a comment that she couldn't look like that though because she's black. I told her I could make her look like that. At least I thought I did. I've done this type of toning before but never on anyone with her complexion. I like to be optimistic and challenge myself. Here's a secret though that made it seem easy. Us photographers, we love grey and middle tones. We can make grey look white in a photo, we can make it look black. We can pretty much make it look like any color we want. Tones in the middle of the spectrum are like a volume knob set to the middle. You can turn it up and down a great degree. Not just in graphics programs like Photoshop or in the darkroom but also with how much or how little light you put on the subject when you snap the picture.
To be clear, she in no way wishes to change the color of her skin. That whole dead-skin look is just very common in this genre and I wanted to show her she shouldn't feel limited.
I chose a picture from our shoot to work on that I thought would look great with this type of toning. Here is the before and after.

The left is the unmodified raw image, the right is the finished product although I may go back and take some more time retouching. TigerLilly has such beautiful eyes I didn't get too many with her eyes closed but I thought the colors on her lids would work better in this style. I'm happy with the results and I think I got the look she we were after while preserving her identity.
Step 1: The Picture

I started out with a picture where TigerLilly was already brightly lit but I bumped the exposure a little bit in CameraRaw to get more of a washed out effect. Shot against a grey wall using my large white DIY scrim as my main light with a single flash head behind it on the right and a second light set at -2 stops into a shoot through umbrella to provide some fill on the left.
Step 2: Overall Curves

Next I added a curves adjustment layer to increase some of the contrast to lighten her skin further and get back some of the richness that was lost in the shadows from increasing the exposure.
Step 3: Toning
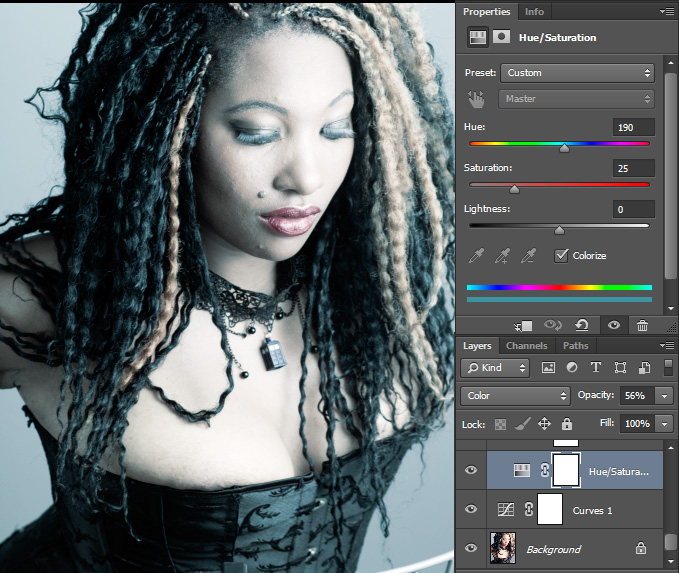
Next I set the overall toning. I created a Hue/Saturation adjustment layer and colorized it towards a green/blue and dropped the saturation to 25%. I still wanted to preserve some of the color so I changed the layer style to Color and brought the opacity to 56%.
That looked a little too washed out for me so I created another Hue/Saturation layer to boost the saturation in the yellows and reds. The lips especially weren't red enough for my tastes. The highlights in her box braids just didn't look right to me so I grouped the two Hue/Saturation layers and applied a mask to the group so I could get some more color back in them by using the eraser tool on the group mask.

Step 4: More Contrast

The shadows felt like they needed to be a little deeper so I added a Curves Adjustment layer, dropped down the shadows a lot, set the layer to Soft Light, Used Image->Apply Image from the menu and adjusted the opacity until I got the depth of shadows I wanted.
Step 5: Background Burning

One of the drawbacks of shooting in a small space is not being able to have as much control over the background through lighting. Instead I had to burn around TigerLilly to create a more dramatic effect. Created a Curves Adjustment Layer, dropped down the high point and the mid curve, then used a large, soft eraser to remove it around the model.
Step 6: Detailed Burning

All the exposure and curves tinkering caused some loss of contrast in the details. The breasts especially lost their shape and that made me sad because... Well that should be obvious why :)
I created a new, blank Soft Light layer and using a paint brush of different sizes and a low opacity I painted black around the areas where I wanted to restore detail.
The cheek looked a little too dark so I painted some white to lighten up the cheek in shadow to restore it's shape.
Step 7: Retouching

Nobody is perfect so I created a new Normal Layer and used the Spot Healing Brush Tool set with Sample All Layers to remove some distracting imperfections which the high contrast lighting accentuated on this otherwise gorgeous face.
Step 8: Eye and Lip Saturation

I wanted the eyes and lips to pop more. One because it would give her skin more of that pale, dead skin, vampire look and two because they looked prettier that way. I created a Hue/Saturation Adjustment Layer and bumped up the saturation pretty high. Inverted the layer mask and used an eraser tool on low opacity to get the lips and eyes where I wanted them.
One last step was just painting the top of the chair out of the bottom corner of the picture.
Final Image
We both like how it turned out but I think I can do a little better with more time to fix some stray hairs and some other issues. What do you guys think?
Model: TigerLilly


0 comments:
Post a Comment